Sunday, August 30, 2015

A well dressed window

If you follow along on Instagram, you might remember me asking for some help in deciding which fabric to use for a window treatment in our recently renovated powder room.
This was the IG picture of my options:


I appreciate all of you that weighed in and loved reading everyone's opinions. It really helped me narrow it down to my final choice which ended up being this Thom Filicia pennock lakeside fabric (second option from the top).


My very talented mom, who also made the window treatments in Charlie's nursery, was able to do the same for this bathroom window. Only this roman shade is even better because it actually goes up and down (Charlie's nursery has roll up shades behind the faux-roman shades).
Here's one DIY tutorial if you are feeling confident!


I'm starting to think I should probably re-name this blog The Patti Projects considering she is the one that takes many of my ideas and brings them to life (visit here, here, and here to see what I'm talking about!)


Once again, thank you mom for all of your help!


A couple more things to do in this bathroom (i.e. the unfinished window sill) and I'll share a full reveal soon!

- Caitlin

Wednesday, August 26, 2015

My Daily Bubble: Make your own magnetic board

I'm excited to share that I will be contributing to My Daily Bubble again!
For some of my previous contributing posts, you can visit herehere, and here.


My latest is post is another project that I recently did in Charlie's playroom.
See how I made this magnetic board by visiting here.
It was really easy to do!


A quick thank you to The Handmade Home for featuring our home!

- Caitlin

Friday, August 21, 2015

Project "zhush" the cottage

As I've been wrapping up getting Charlie's playroom together, my attention has been turning towards our little guest cottage which I think is in need of some "zhushing".


The past few times I've gone in there to clean it up for guests staying over, I've been underwhelmed by it's appearance. Maybe it's my style changing (from just two years ago!) but I just feel like this space needs a little makeover. 

So, I've done what I usually like to do before starting a new decorating project, which is create a mood board so I can better envision what the space could look like.

Here's what I came up with:


If you haven't noticed, my love for blue and white is slowly taking over our house and I want to continue out here too. I've already ordered the duvet and the throw pillows and plan on keeping the existing white lamps that are out there. I already have the silver frames (purchased but never used in our powder room) but will need new nightstands (would love to find something like these ones but at a lower price point), a new rug, and a few new accessories. No big deal, right?

Here's a source list for the above:

bedding (on sale!)
silver gallery frames (also on sale!)
lamps (these were Target and are no longer available but are similar here)
pillows (also on sale!)
rug (have it in gray and love it)

I'll keep you updated on the progress!
- Caitlin

Wednesday, August 19, 2015

No whining!

In general our son has been/is a really great baby and we'll be lucky if number 2 is half as happy and easy-going as Charlie.
That said, we have entered a little bit of a whiny phase that some days has me reaching for earplugs!
So, as I have been decorating his playroom, I thought it'd be kind of cute and fitting that we hang a "no whining" poster in there. 


I originally found this poster via Pinterest and it's available in different styles herehere and here.
However, I wanted it to match the colors of the playroom a little more.


So, the best sister ever (whose home I recently posted about here) re-created it for me in navy and light blue. Thanks Jamie!


I had to smack myself in the head as I put the poster in this frame with the glass in it.
If Charlie or another kid was sitting on the built-in bench, it could easily fall off the wall and break if they grabbed for it.


So, I removed the glass and just used this adhesive spray glue to attach the poster to the cardboard back.


There's just one or two more things to do in the playroom and then it will be ready for a full reveal so stay tuned!


Oh one last thing.
See that light fixture on the left?
I think it's perfectly fine but was considering switching out just the glass dome for this one (I would need to buy two). 
It's not totally necessary but I think would be fun. 
Thoughts?


Thanks for dropping by!
- Caitlin

Friday, August 14, 2015

The blinds that were a bit too big

If you've been following along, then you know I've been plugging away at getting a playroom ready for our son Charlie (just see here, here, and here):


The latest that I've done in here was adding bamboo blinds to the four bare-looking windows.
I decided to go with the same bamboo blinds that I used in our master bedroom, just in a slightly lighter color. 


However, there was one small issue when it came time to order the blinds.
I wanted to mount them on the inside of the windows and ours measure about 22" wide but the smallest width they come in are 23".

Annoying but that didn't stop me.
I did a little searching around on Pinterest and came across posts like this one, this one, and this one in which people trimmed their blinds to fit their windows using all different methods (like miter boxes, hand saws, and even scissors).


I figured I would give it a try. 
At $15 a blind, if it didn't work, it wasn't a huge loss.

So, Chris and I did the following to make these blinds fit 
(I apologize, I dropped the ball and don't have pictures to show each step):

1. First, we wrapped the blinds really tight and secured the bundle with painter's tape.

2. Using his table saw and wearing protective goggles (safety first), Chris trimmed a half inch off each side making sure he didn't cut any of the strings.

And that's it!

Here they are hung up in the playroom:


Now if you look up close, they're not perfect
There's a little bit of splintering of the wood which doesn't bother me but Chris (who is more meticulous than I) suggested I just touch up the ends with some stain or furniture marker. 
If you are hanging drapes on each side, then the splintering really wouldn't be a problem because the window treatments would cover the ends.


Thanks to a coupon code and a free shipping promo, I was able to do all four windows in the playroom for about $45!
I don't think it gets any more affordable!

Have a great weekend,
Caitlin

Friday, August 7, 2015

Talking teepees

I love the teepee trend that seems to be in so many nurseries, playrooms, and even living rooms!
They're fun and playful and I wanted to incorporate one in Charlie's playroom but I didn't want to spend a lot of money.
 So with the help of my mom's sewing skills, we were able to make one together for much less. 


Thanks to Pinterest, I stumbled upon this tutorial by Thrifty and Chic which had very clear step by step instructions on how to make a three-sided one out of a twin sheet that I picked up at Home Goods.


We pretty much followed Alicia's directions with exception to the following:

1. We increased the size of the teepee by a few inches in order to make it a little bit wider (not so much taller). If you wanted to make an even bigger one, I would suggest using a full or queen sized flat sheet.


2. Instead of using scrap fabric for the opening, I used this neon yellow pom pom trim that I ordered here


3. I spray painted the PVC pipe white to make it fresher and then used painters tape to just spray paint the ends neon yellow.


4. I added rubber legs tips (not pictured) to keep the teepee from sliding on the hardwood floor.


I'm so happy with how it turned out but most importantly...


...Charlie loves it!


This playroom is almost complete which makes me a little sad because it has been so fun to decorate (see what else I've done here and here)!

Here's all that is left to do:

1. hang the rest of the blinds (we had to modify them a bit which I will share soon)
2. hang this picture ledge that I ordered for books 
3. pick out some kind of corner shelf for toys
4. print and frame some pictures and art
5. either make cushions or have them made for the top of the built-in bench


A big thank you to Lauren of Bless'er House for featuring our master bedroom as a kick-off to her Fave Space Friday series! 

Hope you have a great weekend!
- Caitlin


Saturday, August 1, 2015

Oh deer... A partial DIY and a look at the playroom built-ins

Charlie's playroom is coming right along and today I'm sharing what I've done on the built-ins.


In the center is what I'm calling a partial DIY.
No, no...I didn't cut cardboard myself to construct this deer head (although I saw this tutorial for the ambitious ones out there). 
Instead, I bought it here and it was quick and easy to assemble.


Once I hung it up, it looked a little puny in the spot.
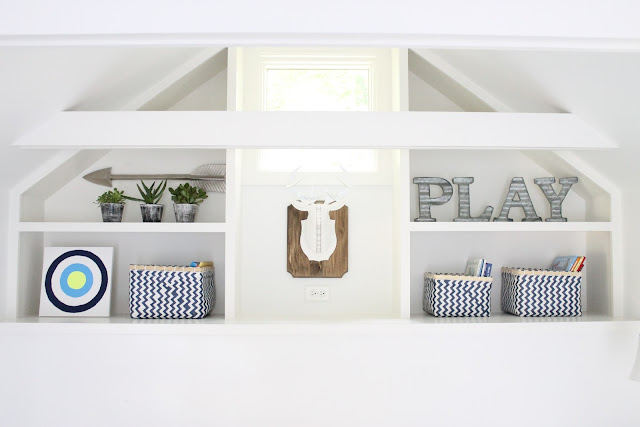
So to beef it up at bit, I bought the wood plaque from Michaels (similar here), stained it, and glued Bucky (that's the deer's name) to it.


You might notice that his antlers are a slightly different shade of white than his head.
I originally painted the antlers blue but then decided I didn't like them that way and painted them back to white.
But now looking at the pictures, I'm thinking I want them painted again!
That's the indecisive Gemini in me. 


Below Bucky is this outlet and I'm considering getting some kind of stereo like this one.
We're big into having music playing a lot of the time and I think it would be fun to have some music on in the playroom.


As for the rest of the shelves, they were fun and easy to put together.


I found this oversized metal arrow at Home Goods and picked up these succulents from Trader Joe's.


This canvas painting (which sort of reminds me of a bullseye) was done by yours truly.
The circles are not perfect but who cares!


These blue and white baskets that I found at Home Goods look pretty similar to these more expensive ones (but currently on sale) from Serena & Lily
As for the metal letters, I picked them up from Michaels for about $7 each.


So that's all for now on the playroom (unless you missed this DIY project I did in here last week)
I'll share more soon, including how my DIY teepee came out!

- Caitlin